Let’s start with this: I don’t believe organic reach is dead. There, I said it! It has, however, gotten significantly harder to reach as far as you used to. With this, a lot of my clients, and myself, are turning to advertising. It’s also worth noting that Facebook Ads is where you manage any Instagram advertising you’re considering.
To make sure I was getting the most out of Facebook’s advertising options, I attended one of their Facebook Boost events in Boston late last year. As it turned out, this was a great time to do so, because they were just rolling out a new type of ad, but more on that later. I’ve also signed up for a couple of Udemy classes on the subject, have another lined up on Skillshare, and continue to read on the subject as new information becomes available.
This post isn’t a step by step, if only because that would be a series — which I’m not ruling out — unto itself. Rather, this post breaks down the individual components of a Facebook Ad Campaign so you can understand what you’re looking at when building one.
Here’s what we’re covering:
- Ads Manager vs. Power Editor
- Your Campaign — Objectives
- Your Ad Set — Budgeting, Scheduling & Targeting
- Your Ads — Ad Types & Tips
Ads Manager vs. Power Editor
Because Facebook really wants you to advertise with them, there are multiple ways you can create an ad. For example, you can boost an individual post directly from your business page. However, that’s a simplified walk-through which is most like Ads Manager, and not really what we’re covering here.
The two primary means of creating an ad on Facebook are the Ads Manager and the Power Editor. Frankly, I tend to use a combination of the two tools, since each excels at it’s own area.
Ads Manager
The Ads Manager is the simpler interface of the two, and what most people who have “dabbled” in Facebook ads have used. It has helpful tips built into the upper right area and lots of “at a glance” type charts so you can quickly see how your advertising is doing.
Ads Manager is where you can view your account settings and billing, as well as manage your Facebook Pixel. Recently, it’s also gotten a lot stronger, in terms of how it lets you build an ad campaign, and has introduced a creation style more similar to Power Editor. It is still not as powerful as Power Editor, however.
I tend to use Ads Manager to quickly manage existing ads. I can quickly view performance and turn different ads/sets/campaigns on and off. I can review my custom audiences created from my Pixel, and create custom audiences from uploaded lists — or create a lookalike audience from either. (If that last sentence read like Greek to you, don’t worry, we’ll go over that in a minute!)
This interface was designed for ease of use, but sacrifices a bit of versatility to do so. As of 4/17/16, here are the different ways you can build a campaign (Objectives) in Ads Manager:
- Boost your posts
- Promote your page
- Send people to your website
- Increase conversions on your website
- Get installs of your app
- Increase engagement in your app
- Reach people near your business
- Raise attendance at your event
- Get people to claim your offer
- Get video views
- Collect leads for your business
Pros: Ease of use, great for those who prefer visuals to understand, Audience Insights
Cons: Fewer options; only 11 of the 14 Objectives are available
Power Editor
Power Editor is an aptly named power house for creating your ads. It’s less intuitive than the Ads Manager, and a lot more data driven, but with that trade off comes versatility.
When you first get into Power Editor, it has to “download” your account information. While we used to do this manually, Facebook finally rolled out an automatic download not long ago, but be aware it may take a moment or two longer to load than Ads Manager.
Trying to navigate the ad materials can be a troublesome, but the interface does allow you to really drill down and narrow what you’re focusing on. It’s also pretty easy to manage your audiences, and easier than Ads Manager to manage your Image Library (pictures for your ads), get super-detailed reporting, and look at individual page posts, all from the main menu.
This is the interface I use almost exclusively for building ads. It’s not as intuitive, but the power trade off is worth it to me. Plus, why wouldn’t you want the full range of options available to you? It’s also painless to set up one campaign, ad set, or ad and then duplicate it. Yes, duplicate. That means if I want to run 3 ads where all of the text is the same but there’s a different image, I can create it once and just duplicate twice, replace images, done! A/B testing at its easiest.
As of 4/17/16, here are the different ways you can build a campaign (Objectives) in Power Editor:
- Boost your posts (called Page Post Engagement)
- Promote your page (called Page Likes)
- Send people to your website (called Clicks to Website)
- Increase conversions on your website (called Website Conversions)
- Get installs of your app (called Mobile App Installs)
- Increase engagement in your app (called Mobile App Engagement)
- Reach people near your business (called Local Awareness)
- Raise attendance at your event (called Event Responses)
- Get people to claim your offer (called Offer Claims)
- Get video views (called Video Views)
- Collect leads for your business (called Lead Generation)
- Product Catalog Sales
- Desktop App Engagement
- Desktop App Installs
Pros: All 14 Objectives are available, more granular targeting for audiences, painless A/B testing tools
Cons: More cumbersome interface, must remember to upload/review changes when done or ads won’t go live, can’t manage pixels, account info, or billing from within it
Now that we have some idea of where we’re going to build an ad, let’s start looking at the individual parts.
Your Campaign — Objectives
Think of Facebook Ads like matryoshka nesting dolls. The Campaign is the biggest one, with your ads sets and individual ads inside. At this level you do 3 very important things: Set an optional spending cap for everything within it, decide on your Buying Type, and set your Objective
While you don’t have to, setting a spending cap at the campaign level can be handy if you have a set budget. Keep in mind that you can also set spending caps at the Ad Set level, to further divide your advertising budget in a way that works for you.
The buying type you choose is pretty important, and in most cases, you’ll want to choose Auction. Auction lets Facebook figure out how much of your budget should go toward showing your ad to an individual. Fixed Price is what to select if you already know what an individual action is worth to you (e.g. if you know each email lead you get is worth $4.25, you can tell Facebook you don’t want to pay more than that for a signup). Fixed Price is only available for Clicks to Website, Desktop Engagement, Desktop Installs, Offer Claims, Page Post Engagement, Video Views and Website Conversions. In my experience, it works best with the Conversion Objective.
This is pretty straight forward, but the Objective tells Facebook what you want to accomplish.
The objectives you can pick are:
- Clicks to Website: Send people to your website
- Website Conversions: Send people to your website to take a specific action. Examples are sign up, purchase, complete survey, etc. You need a pixel for this objective.
- Page Post Engagement: Boost an individual post for more reach, clicks, shares, and comments.
- Page Likes: Promote your Page and get Page likes. (social proof!)
- App Installs: Get installs of your app
- App Engagement: Get people to use your app once installed
- Offer Claims: Create promotions for people to redeem
- Local Awareness: Reach people near your business (best for Local Businesses)
- Event Responses: Raise attendance at your event
- Video Views: Get people to view a specific video
- NEW! Lead Generation – Get people to sign up in just 2 taps of a touch-screen. Learn more here. (This is my new best friend, and will probably become yours, too.)
If you’re in Power Editor, you also have:
- Product Catalog Sales: Show different products to users based on targeting (requires a product catalog uploaded in Facebook)
- Desktop App Engagement: Encourage users to perform actions in your desktop app
- Desktop App Installs: Encourage users to install your desktop app
Any Objectives above with at the end are able to be shown on Instagram as well!
Your Ad Set — Budgeting, Scheduling & Targeting
Once you’ve gotten the above basics down, it’s time to create your Ad Set. This step confuses a lot of people, but it doesn’t have to mind-melt if you break it into chunks.
Think of your Campaign as the folder your ads are kept in. Ad Sets are paper-clipped groups of ads (think sheets of paper!) that all have a few things in common:
- Pixel (if you’re using one)
- Daily or overall budget
- Schedule
- Targeting
- Placement
Every Ad within an Ad Set will have these things in common. Because of this the individual ads within an Ad Set will be “optimized” by Facebook, meaning Facebook will figure out which ads are performing best and show those more often. For most of my clients, Ad Sets will be mostly the same with only changes in Budget and Targeting.
Budgeting
While you can set an overall budget at the Campaign level, Ad Sets let you decided on a budget for each day, or over the course of an Ad Set’s life. For example, if my overall Campaign budget is $300, I can set each of 3 Ad Sets to spend no more than $100 over its lifetime. When that cap is reached, the ad stops running automatically.
Facebook has also introduced some dynamic budgeting which is helpful! If an Ad Set over or under performs, you can adjust the budget by a dollar or percentage. I find this especially helpful when using a daily budget, so I can gradually increase the budget of Ad Sets that perform very well. Here’s a screen capture of how that works:

Scheduling
Ad Sets can be set to have basic start and end dates, of course, but can also have more advanced scheduling if you use the Lifetime Budget.
In addition to choosing your start and end dates, you can choose to run your ad only during certain hours of certain days.
This is helpful if I’m using the Local Awareness Objective, which has a Call Now option, for example. My office hours are 9-5 Monday thru Friday, with a lunch break from 12-1, so I can tell Facebook to show my ads only during the times I’m in the office!
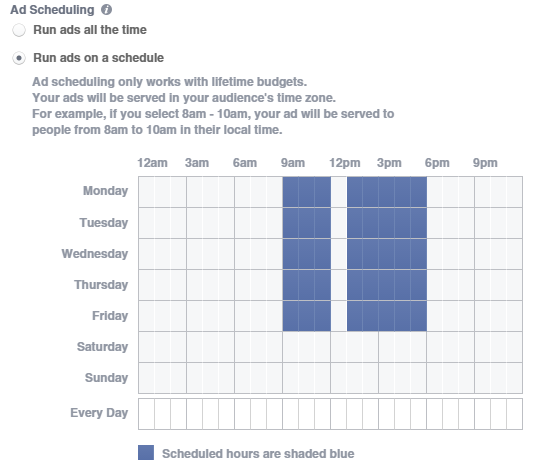
However, remember that the schedule runs on the audience’s time zone, not yours. If you’re using using the schedule in the way I discussed here, be sure your targeting includes only those in your own time zone.
Targeting/Audience
This could have an entire post of its own, easily. Facebook Ads refers to your target viewers of your ad as your “Audience”, (compared to Targeting, it sounds a lot less like you’re hunting them!), but most people I know are more familiar with the term targeting, so that’s why I’ve used it thus far.
This is where Facebook outshines any other advertising platform, hands down, in my opinion. Here are your options for creating an Audience:
- Custom Audiences: These people have genuinely interacted with your brand to some degree, and would likely be either “warm” or “hot” prospects.
- Uploaded from a file, such as subscribers or customers
- Pixel Based — Anyone who visited your site over 180 days or less, or anyone who visited a certain page/performed a certain action on your site. Often called retargeting. You must have a Facebook Pixel on your site for this option.
- Lookalike Audiences: This is when you take an existing Audience and tell Facebook to find a bunch of people that are similar to that existing audience. It also refreshes every 3-7 days when you’re actively using it, so new people trickle in. You’ll get a slider; the percents listed are how dissimilar the lookalike can be, so you’ll want to keep this to a low number, ususally the minimum.
- People similar to subscribers/customers you already have
- People similar to site visitors
- People similar to those who successfully interacted with a previous ad
- People similar to your business page’s fans
- Saved Audiences: People you believe will interact with your ad because of demographic data and interests they have.
I’m going to spend a little more time on that last one, Saved Audiences. While the first two are ideal, they’re really not an option for many Entrepreneurs starting out, since there are minimum list sizes. For example, if you get less than 100 visitors to your site in the time frame you set, you won’t be able to make a Lookalike Audience from it.
Saved Audiences allow you to make an educated guess, essentially, about who your ads should go to. If you don’t have a list to work with and haven’t done the legwork to determine your ideal client, you shouldn’t bother with ads yet. You’ll just be throwing money away. That said, if you do know, you can get crazy specific with this tool.
Just what does Facebook let you target for a Saved Audience (in the US; other countries have restrictions that lessen these targeting options)?
- Location
- Age
- Gender
- Language
- Demographics (I’ll show you what’s in the subgroups for this one only, or this list will never end!)
- Education
- Education level
- Fields of study
- Schools
- Undergrad Years
- Ethnicity
- Financial
- Income
- Net Worth
- Generation
- Home (each has more sub-groups!)
- Home Ownership
- Home Type
- Household Composition
- Life Events
- Anniversary within 30 days
- Away from family
- Away from hometown
- Long distance relationship
- New job
- New relationship
- Engaged 1yr or less
- Married 1yr or less
- Recently moved
- Upcoming birthday
- Friends of
- anniversary within 30 days
- newly engaged
- newlyweds
- recently moved
- upcoming birthday
- Parents (each has more sub-groups!)
- All parents
- Moms
- Politics
- Likely to engage in politics (Conservative or Liberal)
- Self Reported
- Donate to Conservative political causes
- Donate to Liberal political causes
- Conservative
- Liberal
- Moderate
- Very Conservative
- Very Liberal
- Relationship (each has more sub-groups!)
- Interested In
- Relationship Status
- Work
- Employers
- Industries (more sub-groups!)
- Job Titles
- Office Type (more sub-groups!)
- Education
- Interests (each has more sub-groups!)
- Business and Industry
- Entertainment
- Family & Relationships
- Food and Drink
- Hobbies & Activities
- Shopping & Fashion
- Sports & Outdoors
- Technology
- Behaviors (each has more sub-groups!)
- Automotive
- B2B
- Charitable Donations
- Consumer Classification
- Digital Activities
- Expats
- Financial
- Job Role
- Media
- Mobile Device User
- Purchase Behavior
- Residential Profiles
- Seasonal & Events
- Travel
- Categories
- Affinity for High Value Goods – India
- Family Movie
- Fast Food
- Nail Care
…and that list is growing, not shrinking. Additionally, you can combine these options to get very niche.
As an example: I can target Women, ages 30-55, who own a home or make $75-100K a year and like Marie Forleo but exclude corporate executives.
You’ll notice a few things in the above example. First, I can include “and/or” targeting. Second, I can include interests that aren’t listed in the drop-down, so I can target people who like pages with a similar target audience. Third, I can exclude people based on the above demographics, too! (The example Audience is about 120,000 people, by the way. Still a little to broad)
Additionally, I can target people based on Connections. This means I can include or exclude people with relationships to pages, apps, or events I own – or their friends! These can also be combined to create advanced targeting.
Placement
More options. Always with the options! This is great when you’re familiar with what to do, but by now, if you’re new to this, you’re totally overwhelmed.
Placement refers to where your Audience is going to see your ad.
- Mobile News Feed: this will look like any other post to your audience, but only on their phone or tablet
- Instagram: not all Objectives have this option, but you guessed it, this will make your ad show up on Instagram
- Audience Network: the least obvious option, this means that your ad will show in Mobile News Feed and third party sites and apps. Next time you see an ad in that free app you downloaded, remember that may have come from Facebook!
- Desktop News Feed: this will look like any other post to your audience, but will only show in the main feed on desktops/laptops.
- Desktop Right Column: there are 3 or so on the lower right side of the Facebook feed when on a desktop/laptop, and your ad will only display here.
When choosing Mobile News Feed or Audience Network, you can also decide if your ad should only play on Androids, iOSs (iPhones, iPads), or “feature phones”, which is anything not considered a smart phone. You can also choose if the ad only shows when the mobile device is on Wi-Fi, so you don’t kill their data plans.
In my experience, unless you’re looking for installs/engagements on an app, avoid Audience Network. Desktop Right Column is a bit harder to get success with, too.
Optimization
These options change based on your Objective, and generally you’ll want to leave them as-is. There’s Optimization for Ad Delivery, Bid Amount, and When You Get Charged sections.
When it comes to Optimization for Ad Delivery, it defaults to your Objective – makes sense. However, you may see options:
- Impressions – get as many eyes on your ad as possible
- Link Clicks – get as many clicks on your ad as possible (even if they won’t do anything after they’ve clicked)
- Daily Unique Reach – make sure no one sees your ad more than once per day
I’m sure you can see where each might have its uses, but for most it’s best to leave it where it is.
There are two options for Bid Amount, automatic (or “optimized”) and manual.
Optimized bidding lets Facebook set your bid amount to get the most of your objective for the least cost, in theory. Basically, you’ll pay per impression, or each time someone sees your ad.
Manual bidding lets you set what you’re willing to pay for each time the objective is completed. You pay for results, not impressions/views. This is especially useful if you know what a conversion is worth for you. If you know an email subscriber is worth $8, then by all means, set it!
Facebook, and many experts, will recommend you stick with optimized bidding – but I learned a caveat from the Facebook reps. If you’re targeting an audience of less than one million people, you should not use optimized bidding. Manual will allow you to saturate that target market thoroughly before trying to expand elsewhere.
When You Get Charged decides if you pay for impressions, or times your ad is seen, and actions (aka, results!), such as clicks. Some Objectives will let you choose, others it gets decided for you.
There’s also an option for Advanced Delivery, and most of the time you’ll leave this alone. You can, however, opt to go the “Accelerated” route, and show your ads as fast as possible. That puts an emphasis on speed over quality, so I don’t usually recommend it.
Your Ads — Ad Types & Tips
Now we’re at the smallest matryoshka, the single sheets of paper: your individual ads. This is where your “creatives” go, the ad text and images. It’s also where you designate a connected Facebook business page or Instagram account. You’re going to see slight differences here based on the Ad Type you choose.
Ad Types
Most of the Objectives are “Link Ads” – there’s one picture and a link. For these, you can also create “Video Ads” by either uploading a video or choosing a set of images to create a slideshow.
However, there are also the “Carousel Ads” which feature 3-5 images or videos, with different text, calls to action, and links for each one. The user can scroll through them, and Facebook will automatically put the image with the best results first, unless you tell it not to.
Tips
Please don’t overlook this. Unless you’ve just won the lottery or like putting money in your shredder… no? Okay, read on.
- Images can’t have more than 20% text, or your ad account may be shut down! That includes your video’s cover image. Check yours here. (Note: this may be going away. Facebook appears to be rolling out a new, more vague, system.)
- Create different ads for mobile and desktop so you can make them look their best for each. Remember the saying? If you try to chase two rabbits, you won’t catch either.
- “Learn more” is the least successful CTA button, according to the Facebook representative I chatted with at #FBboost.
- Use conversion pixels for each step of your funnel. That way you can see where people are falling off, and target them with ads that are just for their stage in the process.
- Instagram ads should have their own ad. Check the spec’s here.
- Best practices for Link Ads:
- Recommended image size: 1,200 x 628 pixels
- Text above the image: 90 characters
- Headline (bold text below image): 25 characters
- Link description (text below headline): 30 characters
- Video recommendations: There’s a lot of technical info, so have your video editor check them out here.
- Best practices for Carousel Ads:
- Recommended image size: 600 x 600 pixels
- Text above the image: 90 characters
- Headline (bold text below image): 40 characters
- Link description (text below headline): 20 characters
- Video recommendations: Again, lots of technical info, so have your video editor check them out here.